samedi 28 mars 2020

Covid19 - SCCM VPN Clients and Software Update - Bandwidth challenge


Because of coronavirus all people works in remote and connects to the corporate network by VPN.
IT departments are facing a big problem that Microsoft patches chew up a lot of bandwidth when these clients can download the patches from on-premise DP by using the VPN tunnel causing bandwidth slowness and impact for business activity.
There are 2 solutions that I involve to to allow the VPN clients to get their updates directly from MU.
To set the stage, I am not going to be talking about configuration for split tunneling and proxy settings because each VPN/Proxy configuration is unique but you can find in the end of this blog a simple view for that.

Solution 1 :


First Scenario (existing ADR) :

 If you would like to download the package from Microsoft update for existing deployment, please try the option "Prefer cloud based sources over on-promise sources" in the client's boundary group properties. As shown below:


 The clients prefer to download the content from its DP. Only when no DP is available, the client will download the package from the Microsoft Update.
 Also VPN Boundary Group should never fallback to another boundary group’s distribution point:


Also make sure the option "If software updates are not..., download content from Microsoft Updates" is checked on the properties of the deployment.
Deployment options should be : "Do not install updates" this will redirect the client to download from Microsoft updates.


 Second Scenario (new Deployment package):

 Select the "No deployment package" option in "Deployment Package" of the "Deploy Software Update Wizard", then the clients will download content from Microsoft cloud.
 After the clients receive the policy, they will downloaded the packages directly from Microsoft rather than the DP. As shown below:


then do the same as I have shown in First scenario above.

Solution 2:


You can use cloud DP hosted as Platform-as-a-Service (PaaS) in Microsoft Azure. This service supports the following scenarios:
  • Provide software content to internet-based clients without additional on-premises infrastructure
  • Cloud-enable your content distribution system
  • Reduce the need for traditional distribution point


    You won't be able to create a traditional cloud distribution point in the future. The implementation for sharing content from Azure has changed. Use a content-enabled cloud management gateway by enabling the option to Allow CMG to function as a cloud distribution point and serve content from Azure storage.
- Cloud management gateway (CMG) provides a simple way to manage Configuration Manager clients on the internet.


for more information and how you can deploy CMG/CDP :


Once you have configured CMG/CDP now you can allow access to cloud distribution point, under the client settings, click Cloud Services. Under Device/User Settings, set Allow access to cloud distribution point to Yes.


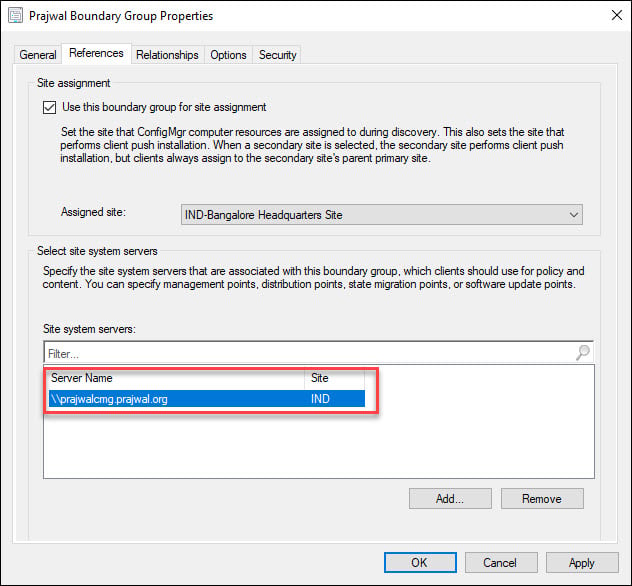
 Then you can associate CMG with VPN Boundary group, if you are using SCCM 1902, you can associate a CMG with a boundary group. You can do this after you setup cloud management gateway. When you create or configure a boundary group, on the References tab, add a cloud management gateway.


Once you setup cloud management gateway and all the site system roles are running, clients get the location of the CMG service automatically on the next location request.
Most of all the clients must be on the intranet to receive the location of the CMG service. By default the polling cycle for location requests is every 24 hours. However to speed up the request, you can restart the SMS Agent Host service (ccmexec.exe) on the computer.


VPN : Split Tunnelling

You can work with your VPN team so that they configure split tunneling:
the goal is to have the clients over VPN which request content from MS cloud to be redirected over the split tunnel to internet.


 Also if you have a proxy configured in your internet settings you should allow the following url to access internet over split tunnel:

  • http://windowsupdate.microsoft.com
  • http://*.windowsupdate.microsoft.com
  • https://*.windowsupdate.microsoft.com
  • http://*.update.microsoft.com
  • https://*.update.microsoft.com
  • http://*.windowsupdate.com
  • http://download.windowsupdate.com
  • https://download.microsoft.com
  • http://*.download.windowsupdate.com
  • http://wustat.windows.com
  • http://ntservicepack.microsoft.com
  • http://go.microsoft.com
  • http://dl.delivery.mp.microsoft.com
  • https://dl.delivery.mp.microsoft.com


samedi 7 mars 2020

Extend and migrate on-premises site to Microsoft Azure


Extend and migrate on-premises site to Microsoft Azure

This tool, introduced in version 1910, helps you to programmatically create Azure virtual machines (VMs) for Configuration Manager. It can install with default settings site roles like a passive site server, management points, and distribution points. Once you validate the new roles, use them as additional site systems for high availability. You can also remove the on-premises site system role and only keep the Azure VM role.

Prerequisites
  • An Azure subscription
  • Azure virtual network with ExpressRoute gateway
Required Azure permissions

You'll need the following permissions in Azure when you run the tool:
Microsoft.Resources/subscriptions/resourceGroups/read
Microsoft.Resources/subscriptions/resourceGroups/write
Microsoft.Resources/deployments/read
Microsoft.Resources/deployments/write
Microsoft.Resources/deployments/validate/action
Microsoft.Authorization/roleAssignments/read
Microsoft.Authorization/roleAssignments/write
Microsoft.Compute/virtualMachines/extensions/read
Microsoft.Compute/virtualMachines/extensions/write
Microsoft.Compute/virtualMachines/read
Microsoft.Compute/virtualMachines/write
Microsoft.Network/virtualNetworks/read
Microsoft.Network/virtualNetworks/subnets/read
Microsoft.Network/virtualNetworks/subnets/join/action
Microsoft.Network/networkInterfaces/read
Microsoft.Network/networkInterfaces/write
Microsoft.Network/networkInterfaces/join/action
Microsoft.Network/networkSecurityGroups/write
Microsoft.Network/networkSecurityGroups/read
Microsoft.Network/networkSecurityGroups/join/action
Microsoft.Storage/storageAccounts/write
Microsoft.Storage/storageAccounts/read
Microsoft.Storage/storageAccounts/listkeys/action
Microsoft.Storage/storageAccounts/listServiceSas/action
Microsoft.Storage/storageAccounts/blobServices/containers/write
Microsoft.Storage/storageAccounts/blobServices/containers/read
Microsoft.KeyVault/vaults/deploy/action
Microsoft.KeyVault/vaults/read


Run the tool
  1. Sign on to the primary site server and run the following tool in the Configuration Manager installation directory: Cd.Latest\SMSSETUP\TOOLS\ExtendMigrateToAzure\ExtendMigrateToAzure.exe
  2. Review the information on the General tab, and then switch to the Azure Information tab.
  3. On the Azure Information tab, choose your Azure environment, and then Sign in.
Tip
You may need to add https://*.microsoft.com to your trusted websites list to correctly sign in.

  1. After you sign in, select your Subscription ID and Virtual network. The tool only lists networks with an ExpressRoute gateway.
Site Server High Availability
  1. On the Site Server High Availability tab, select Check to evaluate your site's readiness.
If any of the checks fail, select More detail to determine how to remediate the problem.
  1. If you want to extend or migrate your site server to Azure, select Create a site server in Azure. Then fill in the following fields:
Name Description
Subscription Read only. Shows the subscription name and ID.
Resource group Lists available resource groups. If you need to create a new resource group, use the Azure portal, and then rerun this tool.
Location Read only. Determined by your virtual network's location
VM Size Choose a size to fit your workload. Microsoft recommends the Standard_DS3_v2.
Operating system Read only. The tool uses Windows Server 2019.
Disk type Read only. The tool uses Premium SSD for best performance.
Virtual network Read only.
Subnet Select the subnet to use. If you need to create a new subnet, use the Azure portal.
Machine name Enter the name of the passive site server VM in Azure. It's the same name shown in the Azure portal.
Local admin username Enter the name of the local administrative user that the Azure VM creates before it joins the domain.
Local admin password The password of the local administrative user. To protect the password during Azure deployment, store the password as a secret in Azure Key Vault. Then, use the reference here. If needed, create a new one from the Azure portal.
Domain FQDN The fully qualified domain name for the Active Directory domain to join. By default, the tool gets this value from your current machine.
Domain username The name of the domain user allowed to join the domain. By default, the tool uses the name of the currently signed in user.
Domain password The password of the domain user to join the domain. The tool verifies it after you select Start. To protect the password during Azure deployment, store the password as a secret in Azure Key Vault. Then, use the reference here. If needed, create a new one from the Azure portal.
Domain DNS IP Used for joining the domain. By default, the tool uses the current DNS from your current machine.
Type Read only. It shows Passive Site Server as the type.


  1. Important
  2. By default the virtual machines are set to No for Use existing Windows Server license. If you want to utilize your on-premises Windows Server licenses with Software Assurance, configure this setting in the Azure portal after the virtual machines are provisioned. For more information, see Azure Hybrid Benefit for Windows Server.
  3. To start provisioning the Azure VM, select Start. To monitor the deployment status, switch to the Deployments in Azure tab in the tool. To get the latest status, select Refresh deployment status.
Tip
You can also use the Azure portal to check the status, find errors, and determine potential fixes.
  1. When the deployment finishes, go to your SQL servers, and grant permissions for the new Azure VM. For more information, see Site server high availability - Prerequisites.
  2. To add the Azure VM as a site server in passive mode, select Add site server in passive mode.
  3. Once the site adds the site server in passive mode, the Site Server High Availability tab shows the status.

  1. Next, go to the Deployments in Azure tab to finish the deployment.
Site database

The tool doesn't currently have any tasks to migrate the database from on-premises to Azure. You can choose to move the database from an on-premises SQL server to an Azure SQL Server VM. The tool lists the following articles on the Site Database tab to help:
Site system roles
  1. Switch to the Site System Roles tab. To provision a new site system role with the default settings, select Create new. You can provision roles such as the management point, distribution point, and software update point. Not all roles are currently available in the tool.

  1. In the provisioning window, fill in the fields to provision the site role's VM in Azure. These details are similar to the above list for the site server.
  2. To start provisioning the Azure VM, select Start. To monitor the deployment status, switch to the Deployments in Azure tab in the tool. To get the latest status, select Refresh deployment status.
Tip
You can also use the Azure portal to check the status, find errors, and determine potential fixes.
  1. Repeat this process to add more site system roles.
  2. Next, go to the Deployments in Azure tab to finish the deployment.
  3. When the deployment finishes, go to the Configuration Manager console to make additional changes to the site role.
Deployments in Azure
  1. Once Azure creates the VM, switch to the Deployments in Azure tab in the tool. Select Deploy to configure the role with the default settings.
  2. Select Run to start the PowerShell script.

  1. Repeat this process to configure more roles.